1. Patient Identification
-
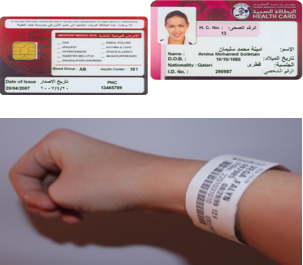
The specimen collector must ensure that the blood is drawn from the right patient.
-
Two main patient identifiers should be used i.e. the patient’s full name and Health Card (HC) Number or QID number or passport number.
2. Hand Hygiene
Perform hand hygiene before patient contact in accordance with Organization policy.
3. Assess & position the patient
Ask the patient if she/he has allergies including anaphylactic shock and/or has a history of fainting associated with venipuncture.
Patients must sit in a chair with safety features to provide support and prevent falls. If a suitable chair is not available, collection must be done with the patient on a bed in a recumbent position whilst ensuring patient safety, confidentiality and privacy.
Reassure the patient and briefly explain the procedure.
4. Apply Tourniquet
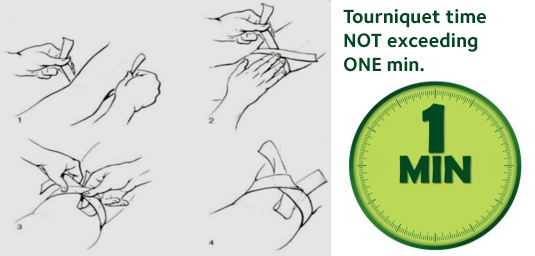
- Place the tourniquet 3-4 inches (about 4–5 finger widths) above the puncture site to compress the vein and facilitate the vein palpitation.
- The tourniquet must be applied with enough tension to compress the vein, but not too tight, because blood flow will slow or stop
- Tourniquet time: Don’t leave the tourniquet on for more than 1 minute to avoid any change in serum analyte concentrations.
- If >1-minute passes, release the tourniquet for 2-3 min. Then re-apply.
- Use non-latex and single-use tourniquet to prevent allergies and infections.
5.Select Venipuncture Site
- The site should be selected by prioritizing veins according to risk to minimize the potential for injuries and complications.
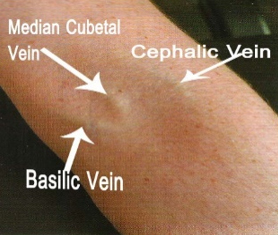
- The preferred sites are: Antecubital area (the Median, Cephalic and Basilic cubital Veins) or dorsal hand veins.
- Avoid veins on palmar wrist & lateral wrist (thumb to mid-forearm).
- Do NOT draw from ankle veins.
- Assess vein for depth, size, direction, and health.
|
First option: Veins in the medical aspect (Centre), i.e., Median and lateral aspect of the median cubital veins
Second option: Veins in the lateral aspect (Outer), i.e., Cephalic vein and Accessory Cephalic vein
Third option: Veins in the medial aspect (Inner), i.e., Basilic vein and medial aspect of the Median cubital vein
|
|
6. Disinfect the Site
- Skin that is visibly dirty should always be washed with soap and water and then disinfected.
- Clean the site with an alcohol swab up and down & back and forth with friction scrub, for at least 30 seconds or according to organizational infection control policy. Always start from the center of the venipuncture site and work outwards to cover an area of 2 cm or more.
- When blood cultures also need to be collected, follow the disinfection procedure for blood
cultures
- Allow the site to air-dry completely.
- DO NOT touch the cleaned site. If the site is touched inadvertently after cleaning,
7. Insert Needle
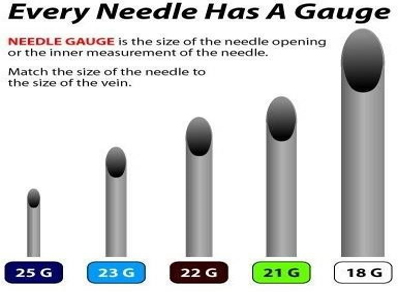
- Select the appropriate device and needle gauge based on the vein characteristics, patient’s age and volume of blood to collect.
- Hold the needle bevel up at 15-30° angle and insert it into the vein.
8. Collect Blood
- Blood collection tubes must be selected according to the test requested and in accordance with the laboratory requirement.
- Fill tubes to the required volume as per test requirements. For details on volume requirements, see A-Z Test
List.
- When multiple samples are collected, the Order of Draw should be followed, according to the table below.
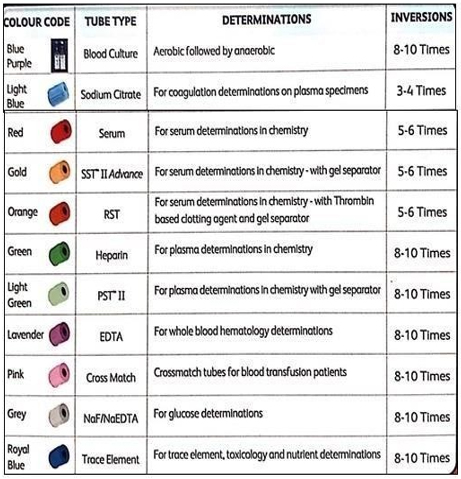
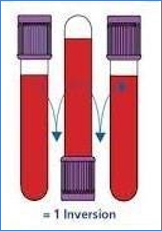
- After filling each tube, immediately mix blood gently by inverting the tube slowly for the required number of inversions according to the table above.
9. Release Tourniquet
- Release the tourniquet immediately after blood starts to flow into the collection tube
- Complete collecting blood in all required collection tubes.
10. Remove needle, dispose and apply pressure
- Remove the needle smoothly, place a clean gauze pad lightly over the venipuncture site and immediately activate the safety feature of the needle.
- Ask the patient to apply pressure on the gauze pad and elevate arm.
- Discard the needle safely in a sharps container.
- Needles must NOT be recapped, bent or broken.
- Check the bleeding has stopped from the venipuncture site before applying a bandage to the site.
11. Labeling of Specimens
- Label specimen tubes immediately after collection, in the patient’s presence.
- For manual labels, the following information is required:
-
Patient’s full name
- Health Card (HC) Number or QID number or passport number.
- Collection date & time
- Collector’s identification (electronic signature)
- Apply the electronic label in a way that all information is visible; the barcode must be positioned carefully.
12.Specimen Handling and Transport
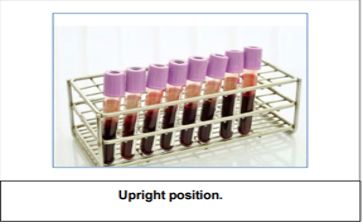
- Place collected tubes in the upright position in a specimen rack. If using the pneumatic tube system (PTS), keep the serum tubes for 30 minutes for complete clotting prior to sending, to avoid hemolysis.
- All specimens must be handled, stored and transported at all times in accordance with universal and standard infection prevention and control precautions.
- All specimens should be considered potentially infectious and should be transported in a closed container/box marked with a biohazard sign.
- Specimen containers should first be placed in a plastic specimen bag with the biohazard sign before putting in the transport container/box marked with the biohazard sign.
- Transport specimens immediately to the laboratory to preserve integrity.
- For further details, please see under
Specimen Handling, Storage and Transport

